Wednesday, February 29, 2012

Hi folks my first shipment of wonderflex came in, so i spent the weekend working on a few different sections of the armor.  The first section i am ready to show you guys is the back bone spine.  It is basically in 2 parts, the main boney back and the center spine part. here is how the center spine looks:


I will be bending this so that it will also follow the curved shape of the back side of the armor.  Here is the rest of the boney look i created for the back.

I am really loving the back!  I decided to go a little further and add additional detail i did not originally plan for it.  I am putting on additional pieces of wonderflex on the existing back to give it more dimensionality,  which will make it a more visually stunning piece.  Here are a few shots on how that is coming out:

Adding the first curved piece of wonderflex to the back.


For some of the skinnier (and small) pieces i use a small clamp to hold it while i blast it with the heat gun, keeps me from burning my own fingers.


This pic shows the spine with both pieces together and the additional detail i installed onto it, I intend to flesh out this detail a bit more once my friendly plastic comes in.


Sunday, February 19, 2012

Hello again, today I went back to work on the pauldrons, spine, and chest piece.  So basically the entire torso region and shoulders.  I cut out the pieces for the shoulder trim and spots where the custom gem I designed will go.  Here are the shots of the Pauldrons:

Here I am pinning the pauldron trim together so I can do a test fit with it.

Trim is now temporarily attached to all pieces of the pauldrons.
                                                                              

Spine Attached to the shoulders, I may add one more set of bone to the top not sure just yet tho.


 Chest and torso piece on and attached as well as I give out a roar to test movement lol.

 Back view of the torso, Spine and pauldrons.

Here I was testing out a tip I want to install on the pauldrons, I have decided instead of using foam for the tip, I will sculpt it and cast it.  Then attach it.

Tuesday, February 14, 2012

The next section of armor I worked on was the shinguard's and feet.  Once again after i cut out all the patterns for it, I grabbed the stick pins and pre assembled it and tested it against my actual body for room and movability. Here are those pics:


All the pieces fit well I am happy with it so far, just gotta finish up the other one now and on to the next part of the costume.
My next section of the DragonScion armor i am tackling is the pauldrons.  Once again I am using the same foam as I did on the horns ( trying to keep this armor as lightweight as humanly possible, yet keeping it very durable.)

After i made my patterns...

I cut them out of the foam using a exacto/ utility knife.  Because this foam is so thick i found it much easier to slice thru it with a fresh blade.  I then did one more step.  I broke out the safety pins and put them together similarly to what it would look like after i put wonderflex on them and affixed them.


After i did the first try out, I adjusted the curve a bit ion the pauldrons to fit better on me.  To me this is a very crucial step any time you are working with big pieces that will be overlaying one another or moving on top of or underneath one another.

This saves you from when a costly mistake when you apply the wonderflex and then realize, either it is to small, too big, or does not site right on top of the other piece.  So far they are sitting just where I need them to on my body.


While i wait for my resin to arrive so i can cast this mold for the gems, I decided to tackle the horns.  I have seen horns done using expanding foam as a base, horns that were sculpted and cast using medium such as silicon, foam latex, and resin.  Even some made out of fiber cast, I wanted to take a different route that was not as messy or time consuming.  I decided to go the route of using badding foam, i went with the semi stiff variety, the type that could bend and be used in shipping or to stuff cushions or be used as barrier for water pipes that sweat.
The other reason i chose to make it out of this material Is that it will be very light, and when i add the wonderflex to it, it will retain a great amount of that lightness yet be resilient. 

Here are some pics on that progress:

I took the  foam and basically rolled up into 3 sections of different widths then duct taped each section separate.


 Then i cut 45 degree angles on the ends and joined each section one at a time and taped the joined parts together.


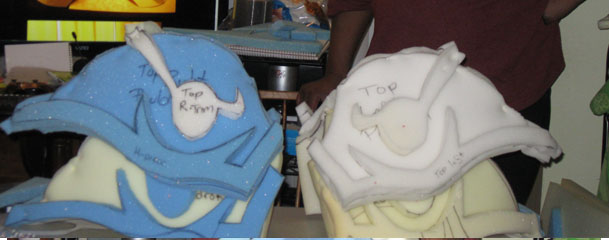
I also added a bit more foam here and there to get it to look like this:


Nice and lightweight, they are ready for the wonderflex  and fossshape treatmeant!

Oh a side note about using this kind of foam, I found it is generally better to purchase it online then at your local store since it seems to absorb the smells from all around it.  It can get a be stinky, lol so if you guy straight from an online distributor you will be mostly stink free.

If you are pressed for time, and cannot wait for it to be shipped to you, then just spray it with ya fave cologne or perfume and after a day the smell will barely be noticable.


Friday, February 10, 2012

Hi again, when I design a piece of armor for a client there are a few steps I always take:

1) Have a solid design, even tho changes organically come as you build it, having a solid base to work from is always best.

2) Once I have my design drawn up (normally i would have gone thru 3 or 4 variations before i am truly happy with it.).  I then think about any special effects I want to install into it.

3) Price of those special effects, such as lights, fog effects, etc.

Once these 3 steps have been met, i go out grab a bunch if not all of the  supplies needed and get to work!

What i have chosen to start with is the gem that will be showcased in the shoulders, it started out as a simple oval gem then i wanted more so i turned it into a skull, then that was not enough so i ended up with a crazy looking skull with 4 horns on the head, now that is going to be a truly unique looking gem, here is how it came out post sculpt.


Next step is form the mold for it.

DragonScion Armor!!

This is the concept sketch I came up with.  I wanted to construct a series of dragon armors for the makers of wonderflex.
This first commissioned piece is being created in the spirit of the Red dragon, here is the artwork I came up with for it!

This is the full body frontal view:
 And this is the upper rear torso view, I am going to have a blast doing all this detail!

I will be doing weekly updates of my costume progress be sure to check back frequently on it!